Enable JavaScript in Firefox
This guide will step you through the process of enabling JavaScript in Firefox.
The screenshots below are taken from Mac OS X, but the process is the same on Windows.
-
Click into the Address Bar
In newer versions of Firefox (Version 24 and above), some of the more advanced settings have been moved to a different location in Firefox and are no longer accessible from the standard "Settings" controls. You now need to go to a special address to be able to change them.
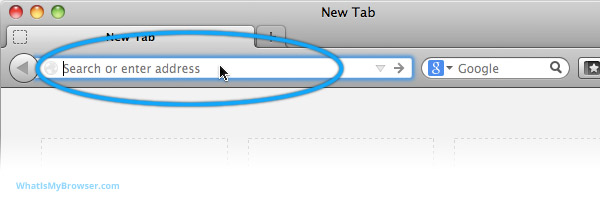
The Address Bar is at the top of the Firefox window and usually shows the URL of the website you're looking at.
-
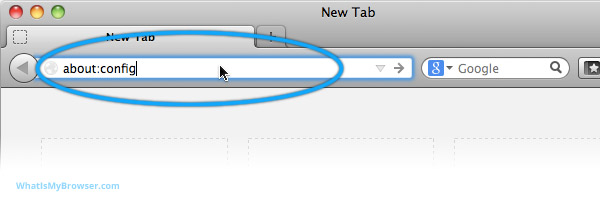
Go to the Advanced Configuration url
In the address bar, type in about:config and press enter. You do not need to put in http:// or www or anything like that; simply put about:config and press the Enter key on your keyboard.
-
Accept the warning about changing settings
Because about:config will give you lots of advanced options which can potentially mess up Firefox, you will be warned about not changing anything you're not sure about. Click the "I'll be careful, I promise" button.

This warning will appear each time you visit about:config unless you untick the "Show this warning next time" button. We recommend keeping this box ticked to remind you each time!
-
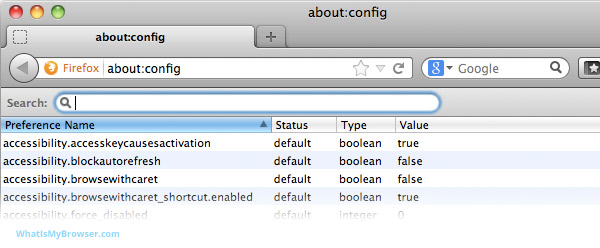
You will now see the list of advanced settings
The list of advanced settings looks like this:
This warning will appear each time you visit about:config unless you untick the "Show this warning next time" button. We recommend keeping this box ticked to remind you each time!
-
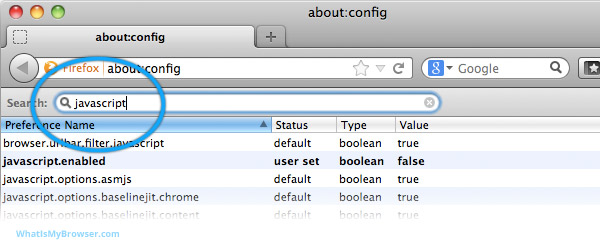
Type "javascript" into the "Search" box at the top to locate the setting you need to change
Because there are so many settings, the easiest way to find the JavaScript setting is to start to type "javascript" into the search box. As you type this, Firefox will reduce the number of settings shown until just the JavaScript based settings appear.
-
Find the "javascript.enabled" preference
One of the settings which you can see should be called "javascript.enabled" in the "Preference Name" column. If you have JavaScript disabled, you should notice that it will be shown in bold text.
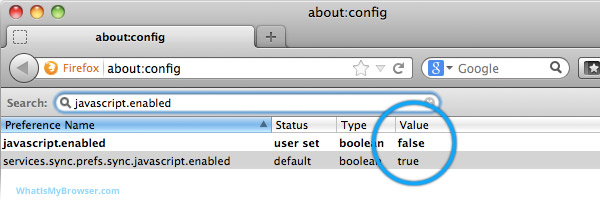
This is because it is not the default setting: the default setting is for "javascript.enabled" to be "true". So that is the setting you need to change.
-
Toggle the false/true preference
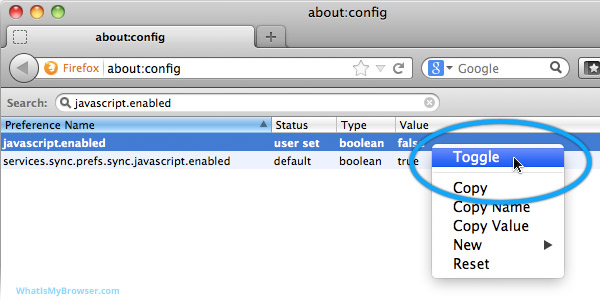
On the line for "javascript.enabled", Right Click (or Command Click on Mac) on the "false" value, you will see a small menu appear, the top option is "Toggle". Click "Toggle", and the "false" will change to "true".
Because "true" is the default setting, the entire line will no longer be in bold either.
This is because it is not the default setting: the default setting is for "javascript.enabled" to be "true". So that is the setting you need to change.
-
Javascript is now enabled. Close the tab.
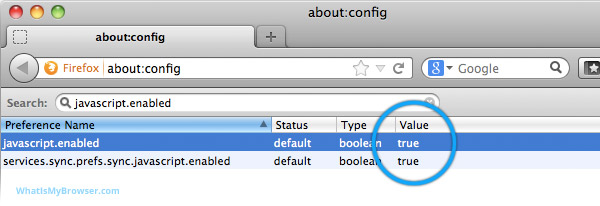
Congratulations. If "javascript.enabled" is now set to "true" it means that JavaScript is enabled in Firefox. Click here to confirm that JavaScript is now enabled.
Looking for guides to enable JavaScript in other web browsers?
Here are some guides for other web browsers like Safari or Firefox.
